> ## Documentation Index
> Fetch the complete documentation index at: https://docs.atomicagi.com/llms.txt
> Use this file to discover all available pages before exploring further.
# Grids
> Organize row-by-row work in spreadsheet-style project workspaces
 Use Grids when a task starts with a list: keywords, URLs, pages, products, or briefs. A Grid keeps those items in rows so you can add simple fields, sort columns, and review work in one project workspace.
## Questions this page should answer
1. Which list should become rows?
2. Which fields should become columns?
3. Which rows need review, cleanup, or follow-up?
## Before you create a grid
* Start with one clear list of inputs.
* Decide what the `Title` column should represent.
* Add only the columns you need for the next decision.
* Use separate sheets when two lists need different structure.
## What this page gives you
* Project-level Grid workspaces.
* Sheets inside each Grid.
* Five starter rows and one starter `Title` column.
* Text, number, date, content, JSON, URL, image URL, and workflow columns.
* Inline cell editing.
* Sheet tools for creating, importing, reordering, renaming, duplicating, and deleting sheets.
* Row tools for selecting, deleting, and dragging rows into a new order.
* Column tools for inserting, renaming, changing type, sorting, and deleting columns.
* CSV export for the active sheet.
## Create a grid
Open `Automation > Grids`, then use `New Grid`.
Each new Grid starts with one sheet named `Sheet 1`, one `Title` column, and five empty rows.
Use the in-table `Add Column` header and `Add Row` row to expand the active sheet.
## Manage sheets
Use Grids when a task starts with a list: keywords, URLs, pages, products, or briefs. A Grid keeps those items in rows so you can add simple fields, sort columns, and review work in one project workspace.
## Questions this page should answer
1. Which list should become rows?
2. Which fields should become columns?
3. Which rows need review, cleanup, or follow-up?
## Before you create a grid
* Start with one clear list of inputs.
* Decide what the `Title` column should represent.
* Add only the columns you need for the next decision.
* Use separate sheets when two lists need different structure.
## What this page gives you
* Project-level Grid workspaces.
* Sheets inside each Grid.
* Five starter rows and one starter `Title` column.
* Text, number, date, content, JSON, URL, image URL, and workflow columns.
* Inline cell editing.
* Sheet tools for creating, importing, reordering, renaming, duplicating, and deleting sheets.
* Row tools for selecting, deleting, and dragging rows into a new order.
* Column tools for inserting, renaming, changing type, sorting, and deleting columns.
* CSV export for the active sheet.
## Create a grid
Open `Automation > Grids`, then use `New Grid`.
Each new Grid starts with one sheet named `Sheet 1`, one `Title` column, and five empty rows.
Use the in-table `Add Column` header and `Add Row` row to expand the active sheet.
## Manage sheets
 Use the sheet tabs at the top of the workspace to switch sheets. Drag a sheet tab to change the sheet order.
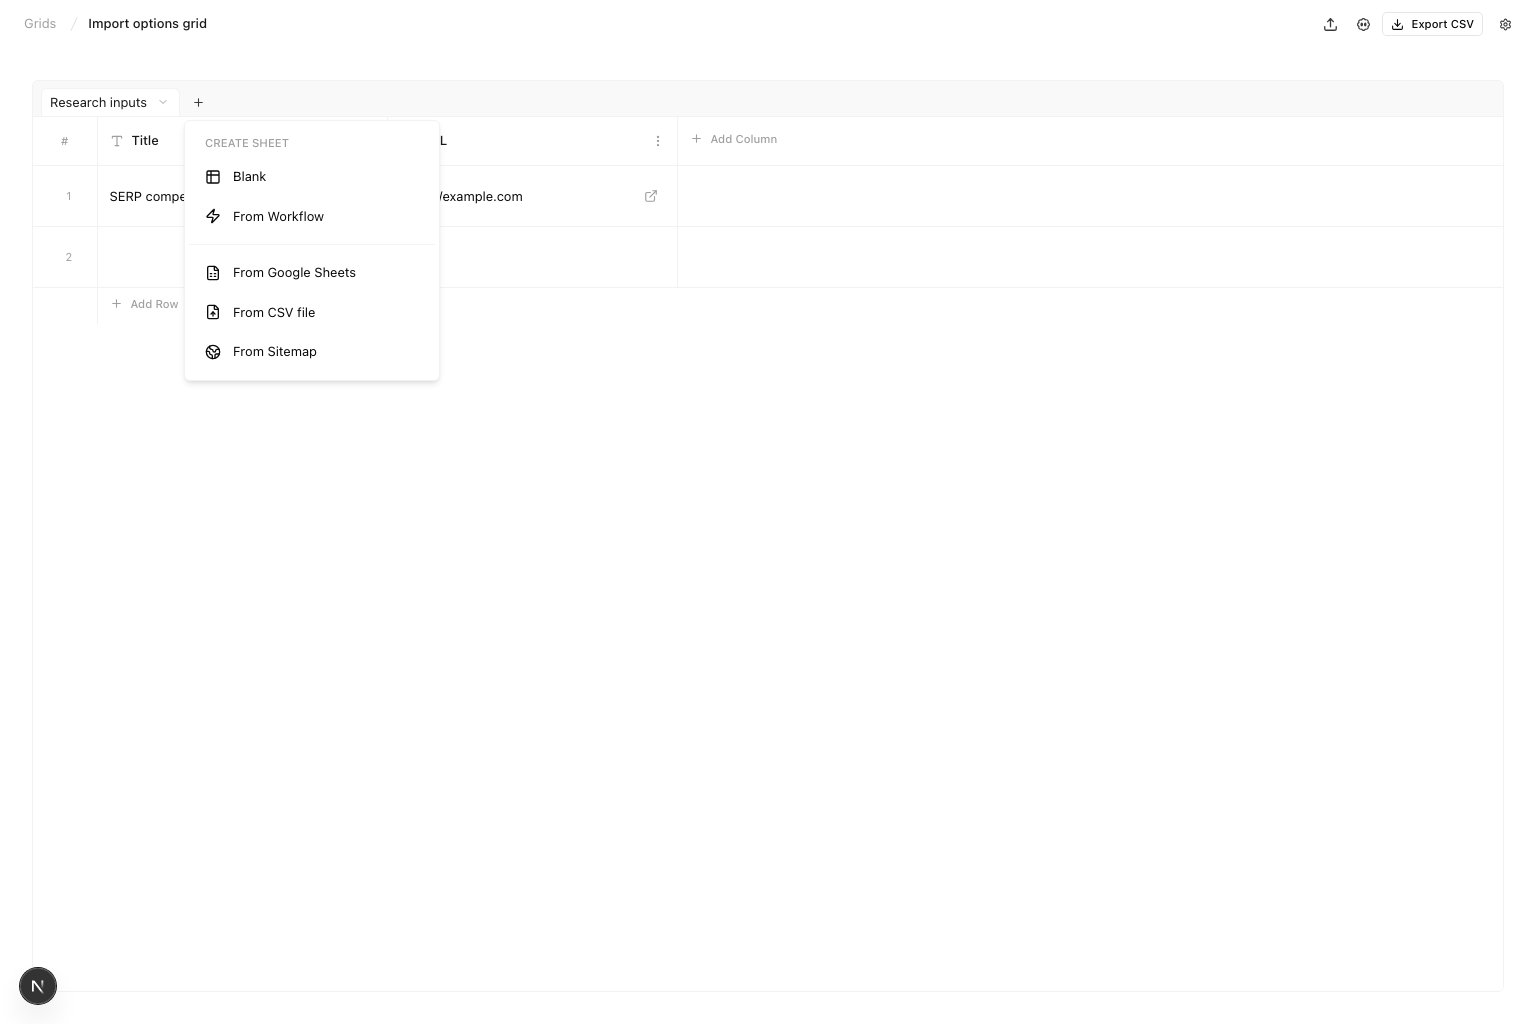
Click `+` in the tab strip to add another sheet. You can start with a blank sheet, import a public Google Sheet, import a CSV file, import URLs from a sitemap, or create a sheet from a workflow.
Use the sheet tabs at the top of the workspace to switch sheets. Drag a sheet tab to change the sheet order.
Click `+` in the tab strip to add another sheet. You can start with a blank sheet, import a public Google Sheet, import a CSV file, import URLs from a sitemap, or create a sheet from a workflow.
 Google Sheets imports use the first row as column headers and create one row for each remaining spreadsheet row. Use a public Google Sheets share link so Atomic can read the sheet export.
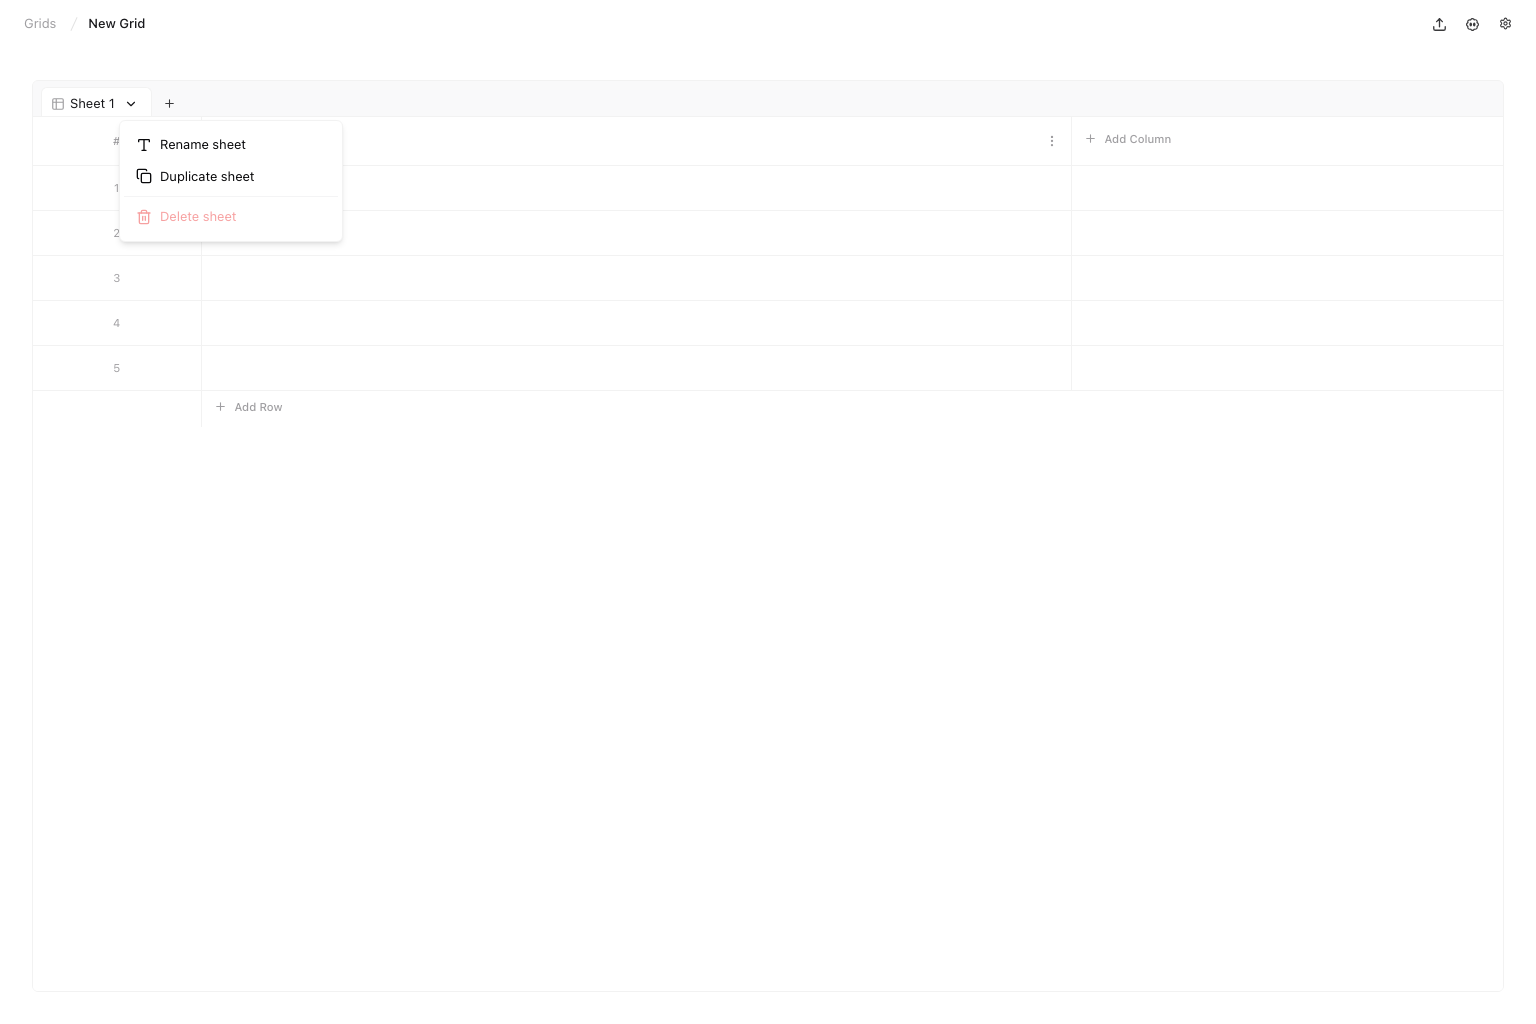
Open a sheet menu when you need to rename, duplicate, or delete a sheet. Delete is only available when the Grid has more than one sheet.
## Add columns
Google Sheets imports use the first row as column headers and create one row for each remaining spreadsheet row. Use a public Google Sheets share link so Atomic can read the sheet export.
Open a sheet menu when you need to rename, duplicate, or delete a sheet. Delete is only available when the Grid has more than one sheet.
## Add columns
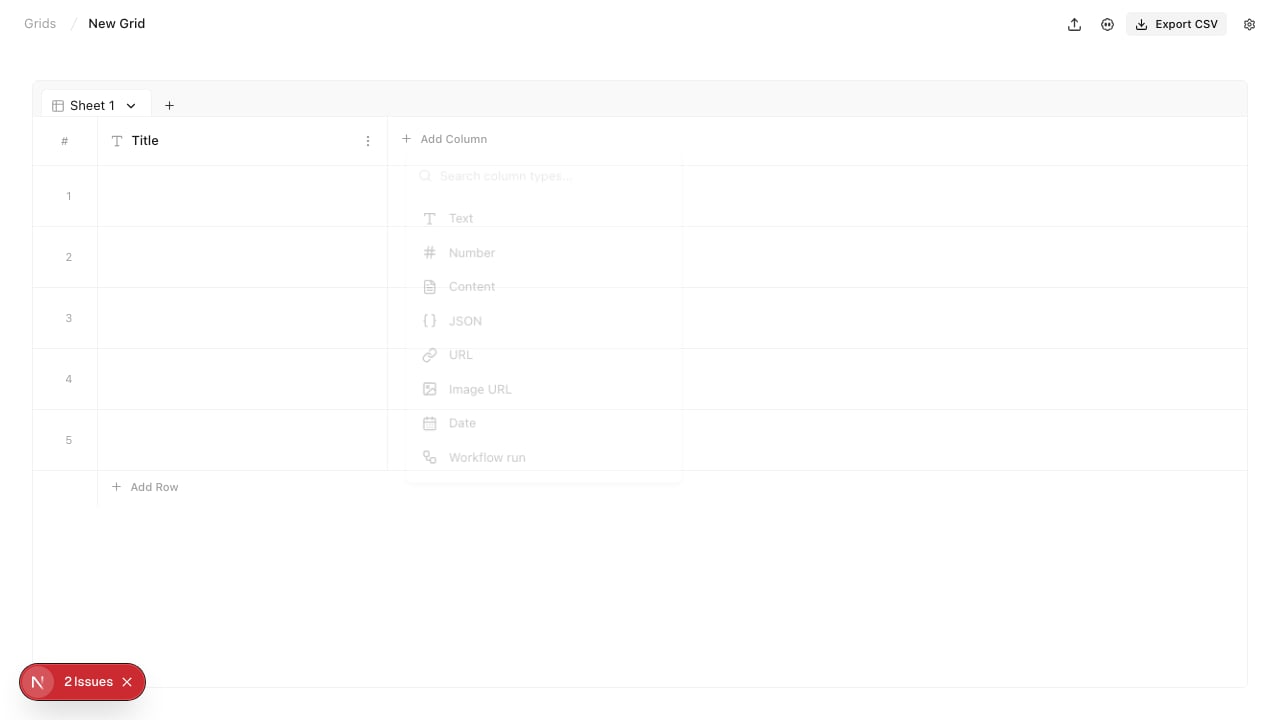 Use `Add Column` for row data such as:
* Text
* Number
* Date
* Content
* JSON
* URL
* Image URL
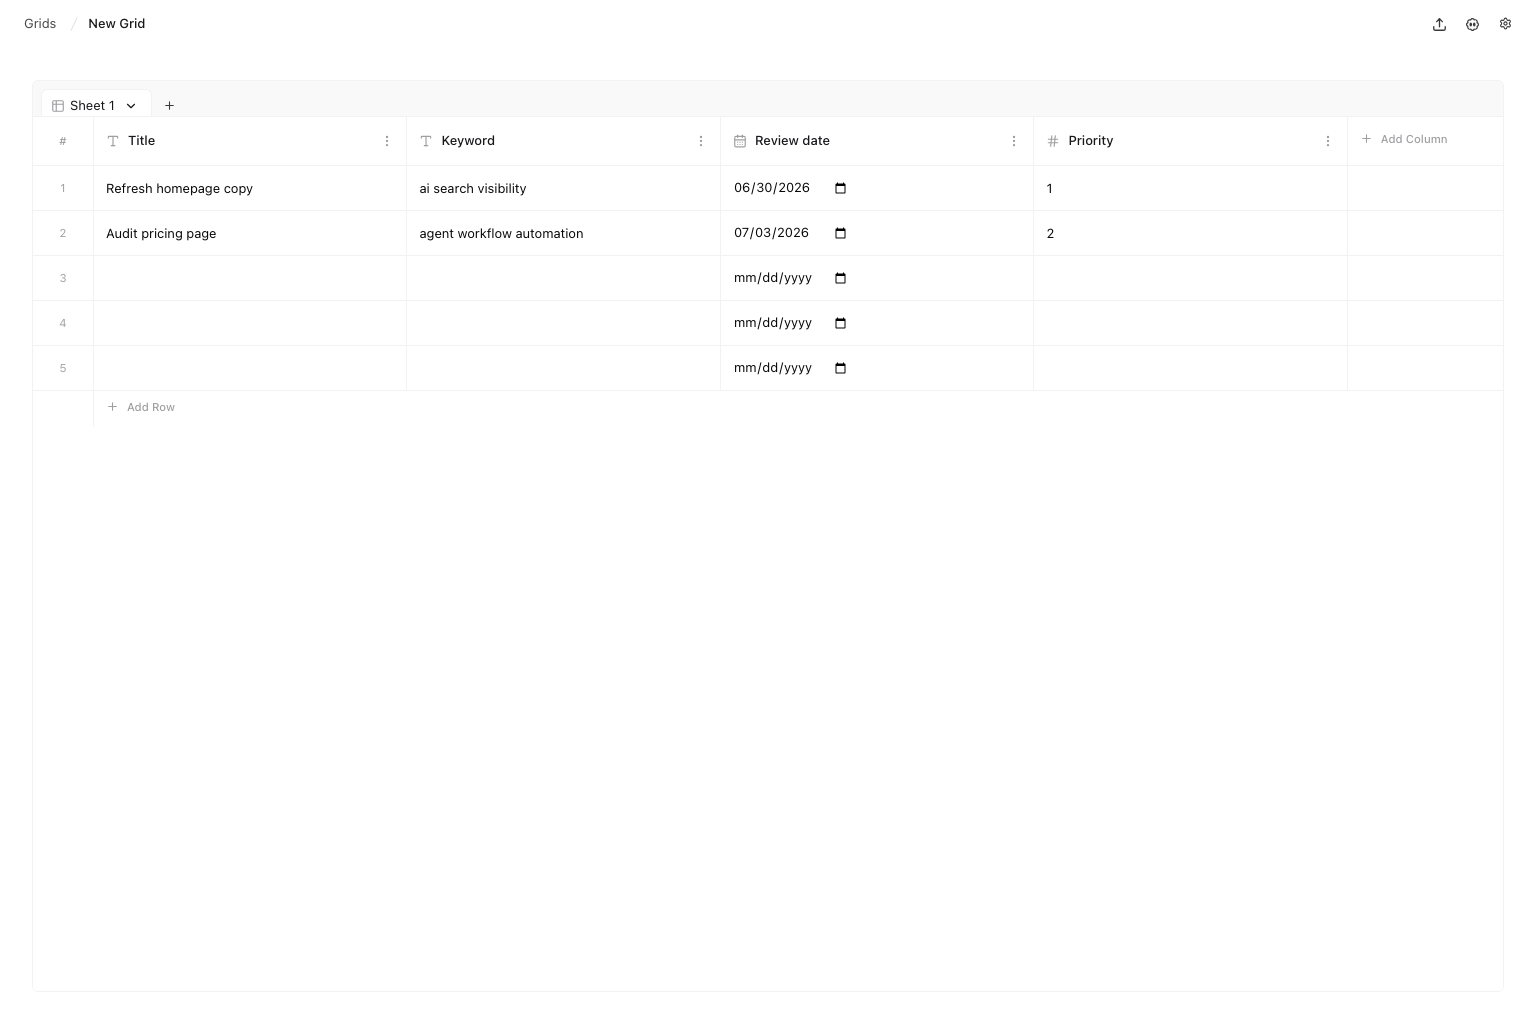
Use text for names, keywords, notes, and free-form values. Use number for priority, score, volume, or counts. Use date when the row needs a due date, review date, or publish date.
Use `Content` for longer writing. It opens in a full-screen editor. Use `JSON` for structured values. Invalid JSON stays editable until you fix it. Use `URL` for links. Valid links show an open-in-new-tab action. Invalid links show a warning. Use `Image URL` when the cell should show an image preview from a URL.
Use `Workflow run` when each row should run the same workflow with row-specific inputs.
Use `Add Column` for row data such as:
* Text
* Number
* Date
* Content
* JSON
* URL
* Image URL
Use text for names, keywords, notes, and free-form values. Use number for priority, score, volume, or counts. Use date when the row needs a due date, review date, or publish date.
Use `Content` for longer writing. It opens in a full-screen editor. Use `JSON` for structured values. Invalid JSON stays editable until you fix it. Use `URL` for links. Valid links show an open-in-new-tab action. Invalid links show a warning. Use `Image URL` when the cell should show an image preview from a URL.
Use `Workflow run` when each row should run the same workflow with row-specific inputs.
 When you choose `Workflow run`, Grids opens a side drawer. Name the column, choose a workflow, then map the workflow inputs to existing columns, new columns, hardcoded values, or empty optional inputs.
## Enter row values
Click into a cell and type the value. The cell saves when you leave it.
Use `Add Row` at the bottom of the table when the starter rows are full. Keep one idea, page, keyword, or task per row so sorting stays useful.
Hover over a row number to show row controls. Use the checkbox to select rows. Selected rows show a delete action at the bottom of the workspace. Use the drag handle to reorder rows.
## Manage columns
When you choose `Workflow run`, Grids opens a side drawer. Name the column, choose a workflow, then map the workflow inputs to existing columns, new columns, hardcoded values, or empty optional inputs.
## Enter row values
Click into a cell and type the value. The cell saves when you leave it.
Use `Add Row` at the bottom of the table when the starter rows are full. Keep one idea, page, keyword, or task per row so sorting stays useful.
Hover over a row number to show row controls. Use the checkbox to select rows. Selected rows show a delete action at the bottom of the workspace. Use the drag handle to reorder rows.
## Manage columns
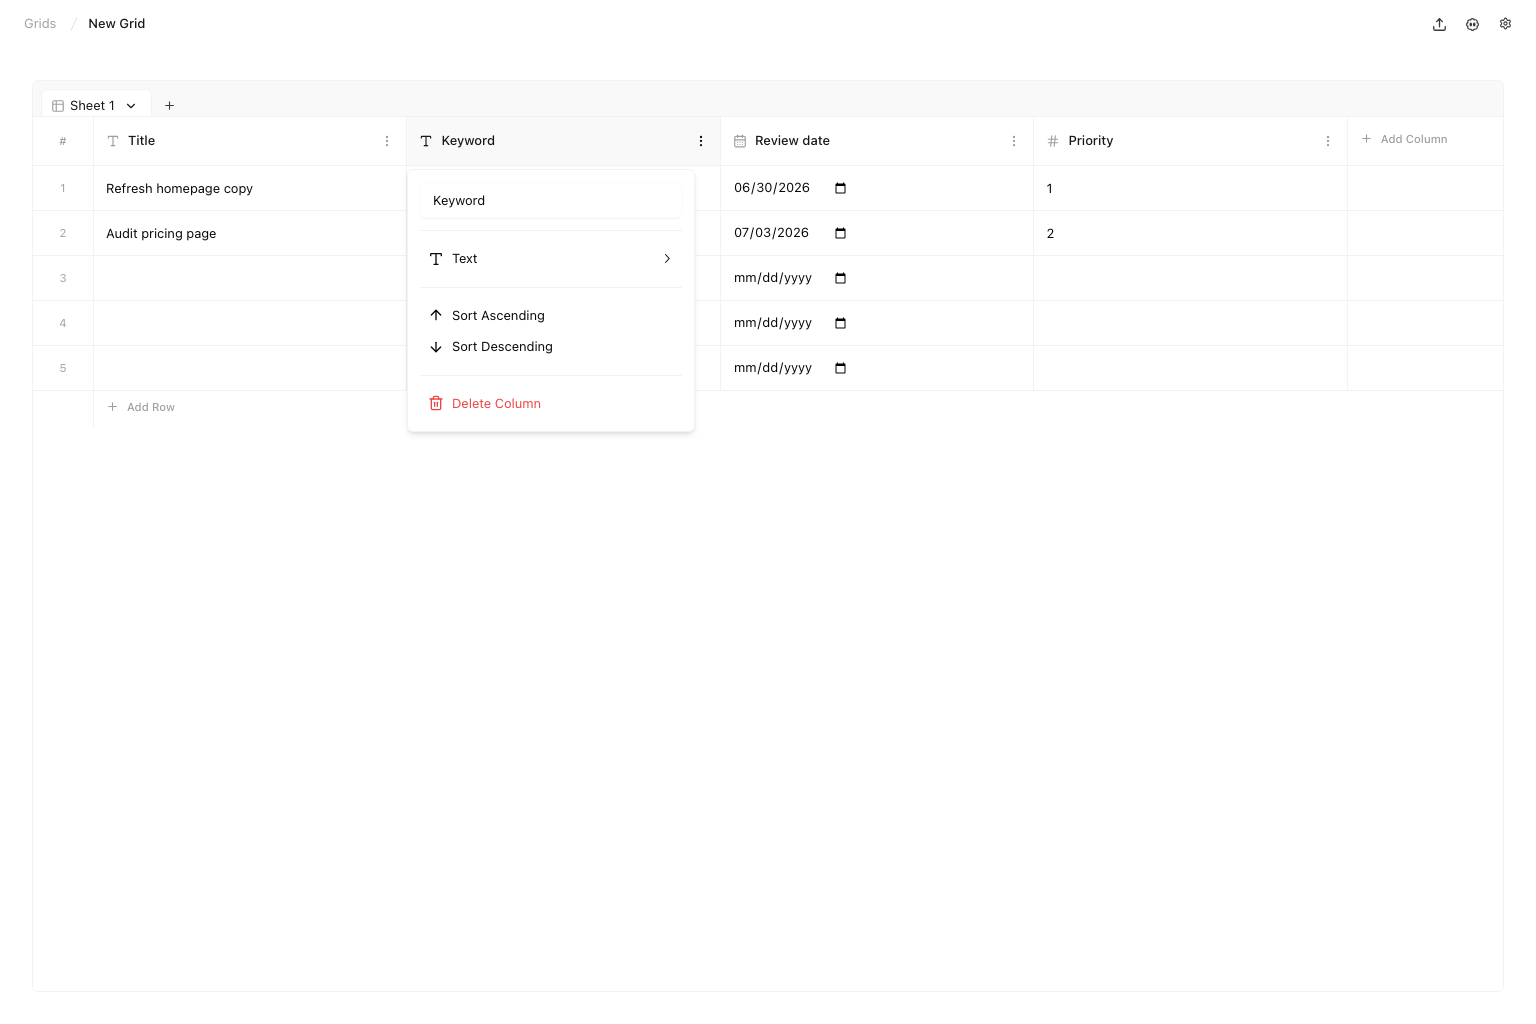 Click a column header to rename it, insert a column to the left or right, change the column type, sort rows by that column, or delete the column.
Changing a column type changes how the cells in that column are edited. Check existing values after changing type, especially when moving between text, number, and date.
## Export a sheet
Use `Export CSV` to download the active sheet. The export uses the current sheet columns and row order. Values with commas, quotes, or line breaks are escaped for CSV.
## Quick routine
1. Create a Grid for one list.
2. Add the columns needed to review that list.
3. Fill the first few rows.
4. Sort by priority, date, or another decision column.
5. Select and delete rows that no longer belong.
6. Export CSV when you need to review or share the active sheet outside Atomic.
7. Add a new sheet when the next list needs different columns.
## Keep in mind
* Grids are project-level workspaces.
* New Grids and blank sheets start with one `Title` column and five rows.
* Google Sheets, CSV, and sitemap imports create a new sheet from the linked, uploaded, or discovered data.
* Keep column names short so the table stays easy to scan.
* Delete removes the selected rows, sheet, or column and its data.
## Where to go next
* [New chat](/automation/new-chat/overview): ask an agent to help plan or populate a Grid
* [Agents](/automation/agents/overview): choose agents for repeatable project work
* [Workflows](/automation/workflows/overview): build reusable workflows for structured work
Click a column header to rename it, insert a column to the left or right, change the column type, sort rows by that column, or delete the column.
Changing a column type changes how the cells in that column are edited. Check existing values after changing type, especially when moving between text, number, and date.
## Export a sheet
Use `Export CSV` to download the active sheet. The export uses the current sheet columns and row order. Values with commas, quotes, or line breaks are escaped for CSV.
## Quick routine
1. Create a Grid for one list.
2. Add the columns needed to review that list.
3. Fill the first few rows.
4. Sort by priority, date, or another decision column.
5. Select and delete rows that no longer belong.
6. Export CSV when you need to review or share the active sheet outside Atomic.
7. Add a new sheet when the next list needs different columns.
## Keep in mind
* Grids are project-level workspaces.
* New Grids and blank sheets start with one `Title` column and five rows.
* Google Sheets, CSV, and sitemap imports create a new sheet from the linked, uploaded, or discovered data.
* Keep column names short so the table stays easy to scan.
* Delete removes the selected rows, sheet, or column and its data.
## Where to go next
* [New chat](/automation/new-chat/overview): ask an agent to help plan or populate a Grid
* [Agents](/automation/agents/overview): choose agents for repeatable project work
* [Workflows](/automation/workflows/overview): build reusable workflows for structured work